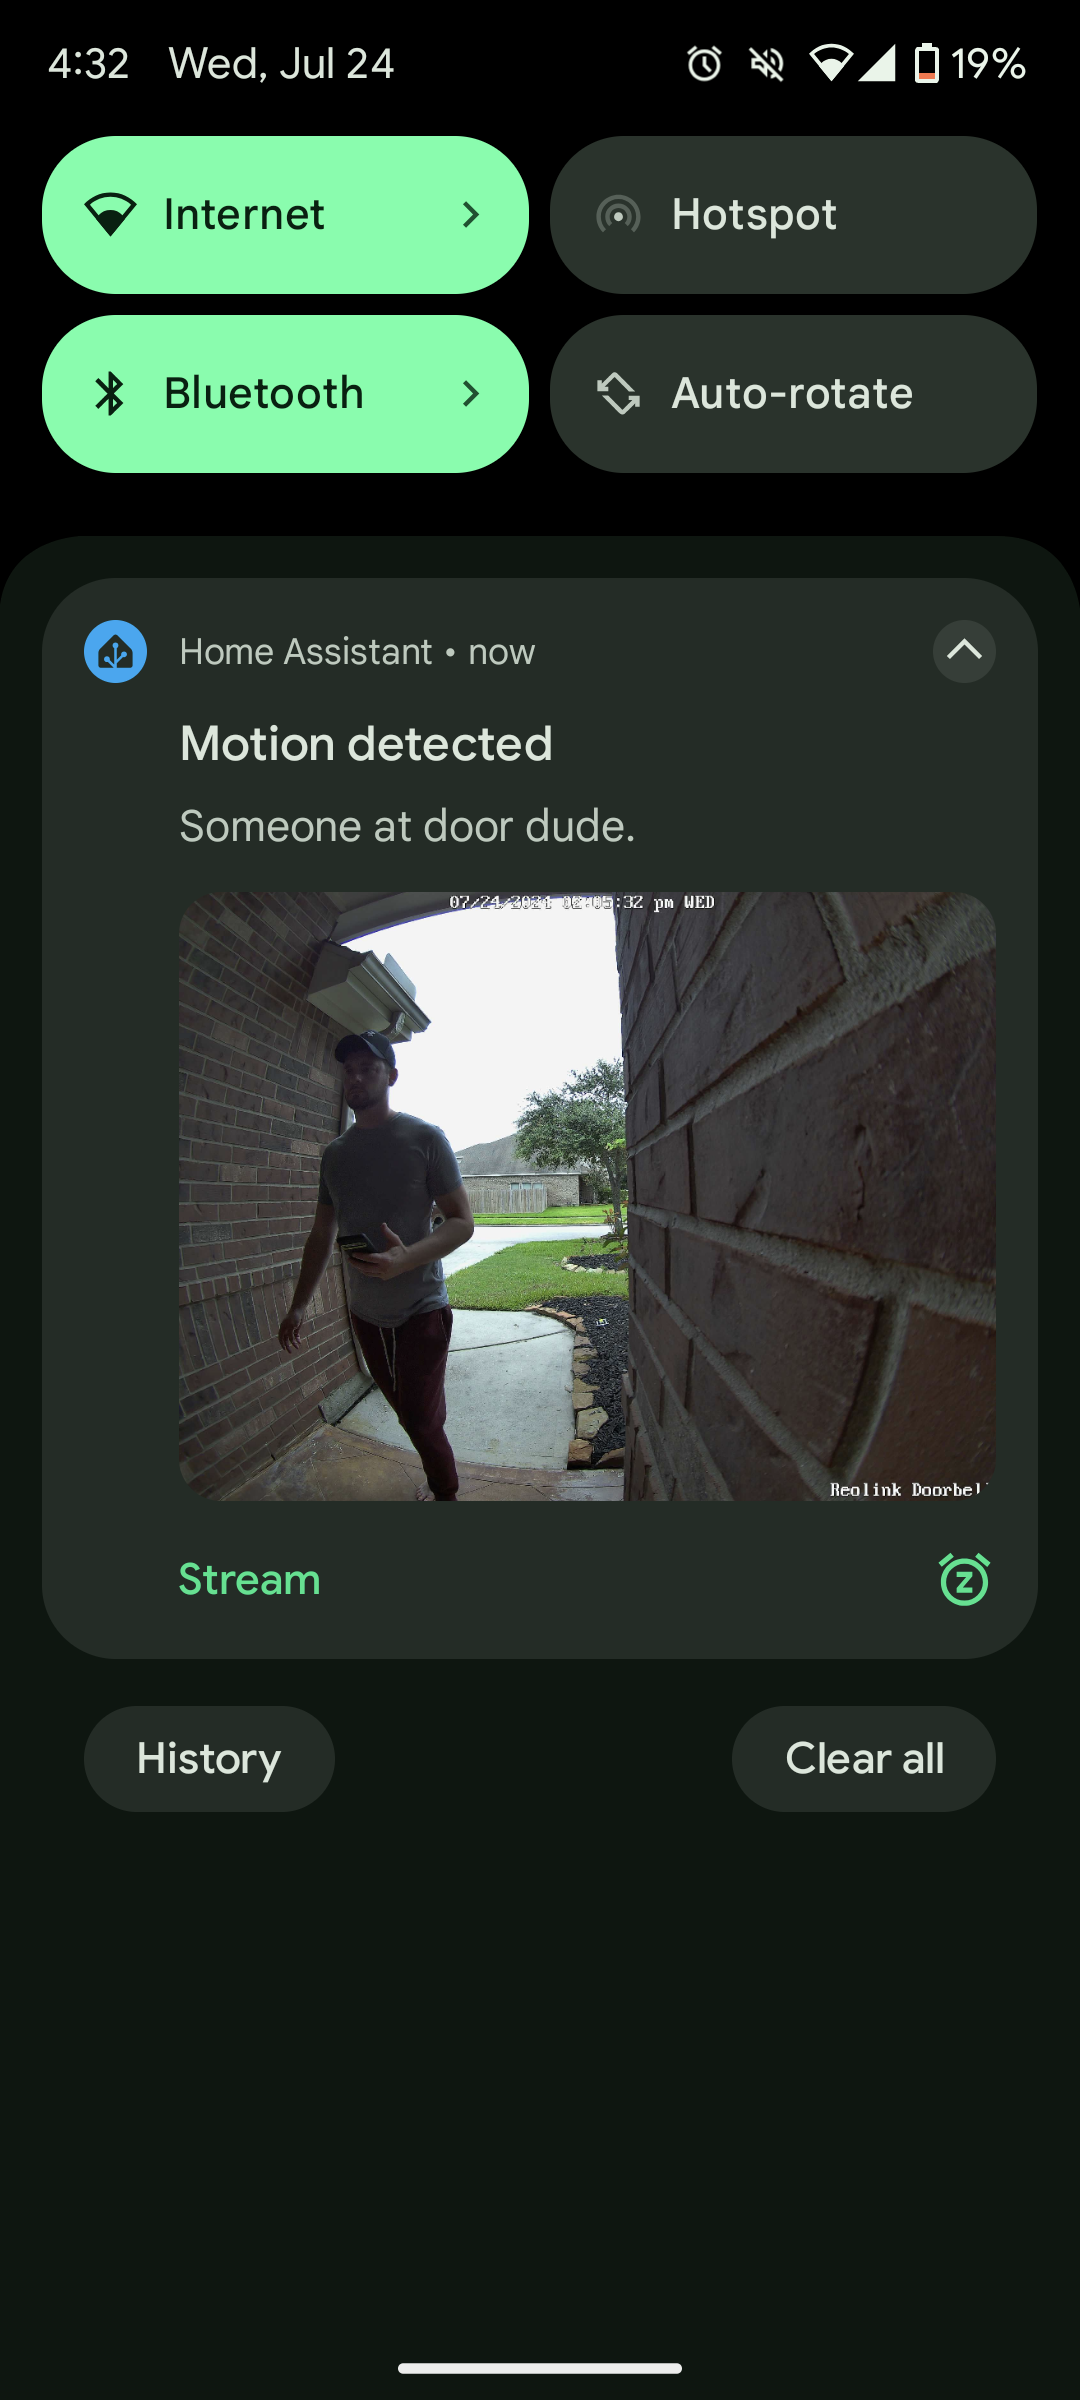
In this guide. I’m going to show you how to receive doorbell images in Home Assistant using the Reolink integration. This is great for getting a visual notification of WHO is at the door when someone approaches.
I know my title says Reolink, but that’s just because that’s the doorbell I have. However, this guide will work with ANY doorbell camera, because we are using the built-in Home Assistant snapshot service. This Reolink doorbell works on wifi or ethernet, and doesn’t require a subscription like the Ring cameras or any others do, so I splurged and purchased this. So don’t shy away from setting this up just because you have a different make or model; it should still work the exact same way!
This guide will send you a photo of the person at your front door, as well as a message you specify, when a “person” is detected at your doorbell. However, feel free to edit the automation to change things up from ‘motion detected’ to ‘doorbell pressed’ or whatever else you want to do, as well. I prefer using Home Assistant for these kind of notifications because:
- The Reolink app often sends false positives.
- I can totally disable the Reolink notifications and use Home Assistant rich notifications instead. Allowing me to not only see the photo, but also click a link to view the live stream of who’s at the door.
Also, if you are using Nabu Casa (or have your HA instance exposed using DuckDNS or another service) you can receive photo notifications while at home, or away!
ALSO….
I have a guide to get the livefeed of your video doorbell casted to your Nvidea Shield/Google TV using the power of Home Assistant – check that out as well!
Let’s get started!
Prerequisites
For my setup, I needed to:
- Integrate my Reolink doorbell using the core Reolink integration.
- Have a subscription to Nabu Casa (If you aren’t using Nabu Casa but have your server exposed another way, that should still be fine!)
I won’t be showing how to setup/integrate those, because those are pretty straight forward and there are a lot of guides online demonstrating how to do that.
Instead, I’ll just be showing you how to get a snapshot from your camera once motion is detected via the automation I use.
The way it works is:
- When motion is detected, I tell Home Assistant to take a snapshot and store it to the
wwwfolder. - Then, the automation displays the image in an Actionable Notification, along with a message, once motion is detected.
- I also include a button in the Actionable Notification that lets me quickly view the RTSP stream of the doorbell with a single press of the button.
Automation
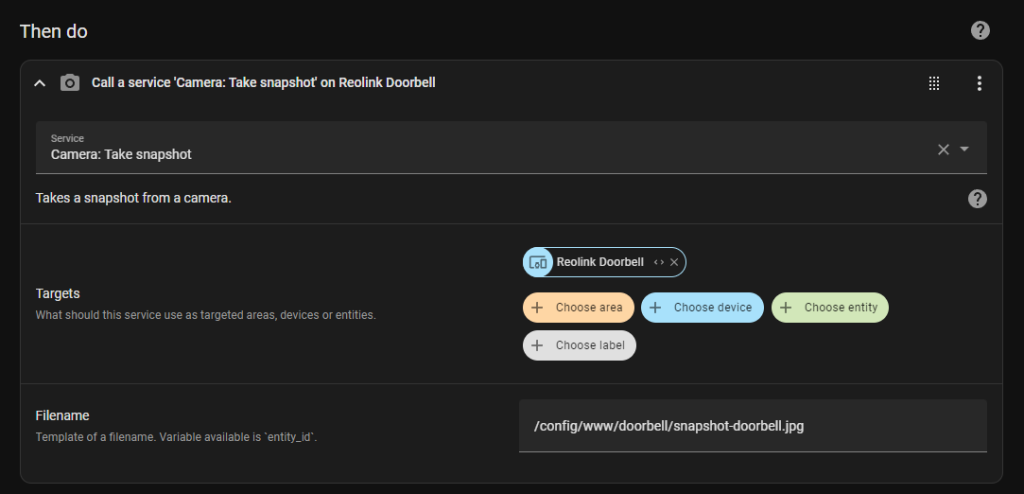
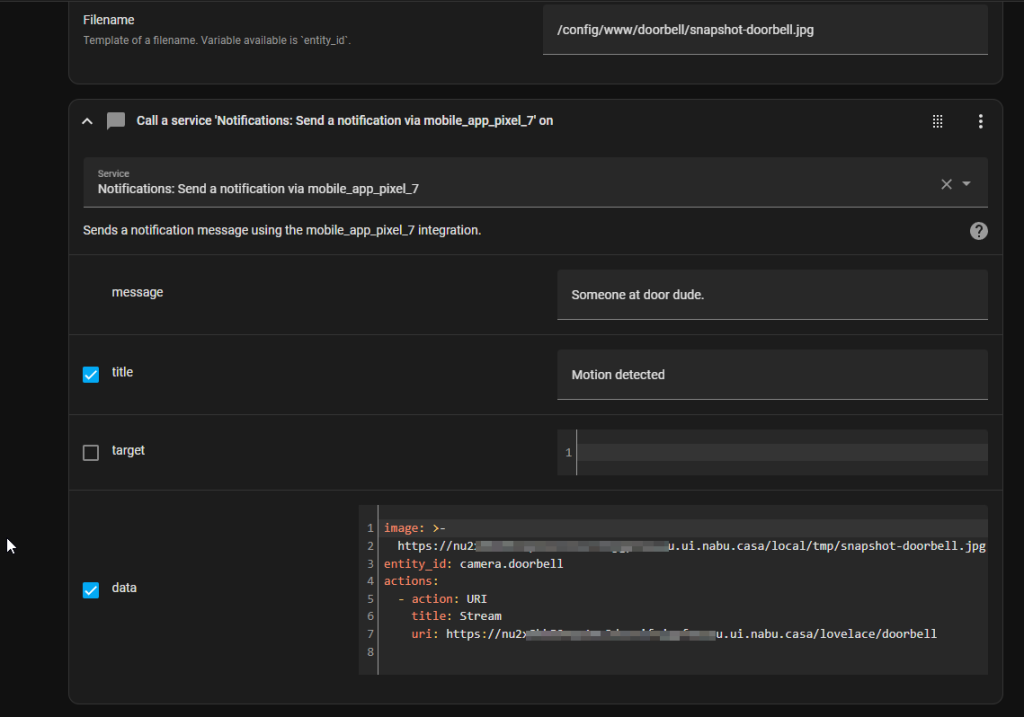
First, I’ll show you the visual editor configuration with screenshots, and at the end – I’ll paste my YAML. If copying/pasting my YAML, you can just swap out the camera entity and mobile device entity with your own (highlighted colors for quickly identifying what to change), and you can be on your way!
- The device is obviously your camera entity.
- The filename can be whatever you choose, but it has to be in the www folder. I chose to create a new directory called ‘doorbell’ to differenciate instead of a standard ‘tmp’ folder that other Home Assistant bloggers use.
- The Home Assistant URL in screenshot 3 (my Nabu Casa URL) is optional.
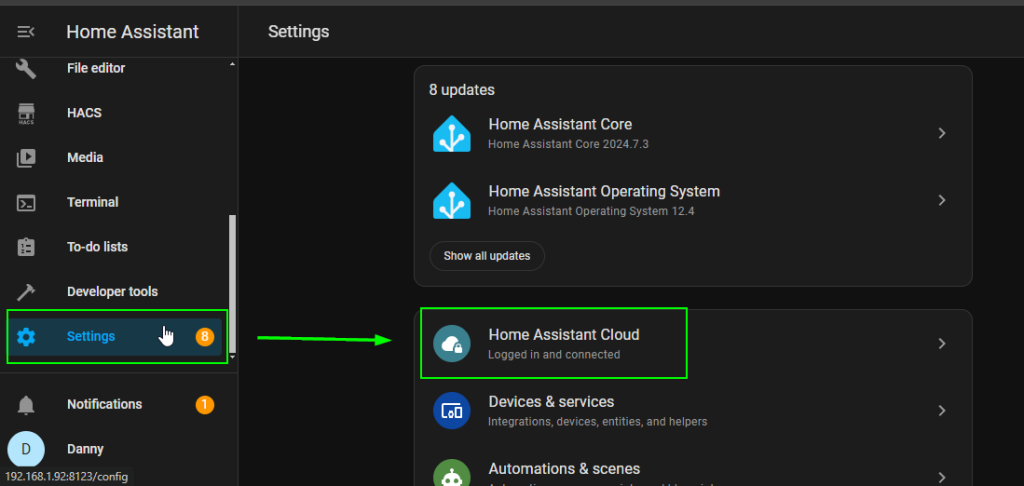
- If using Nabu Casa, the URL can be found by navigating to: Settings > Home Assistant Cloud
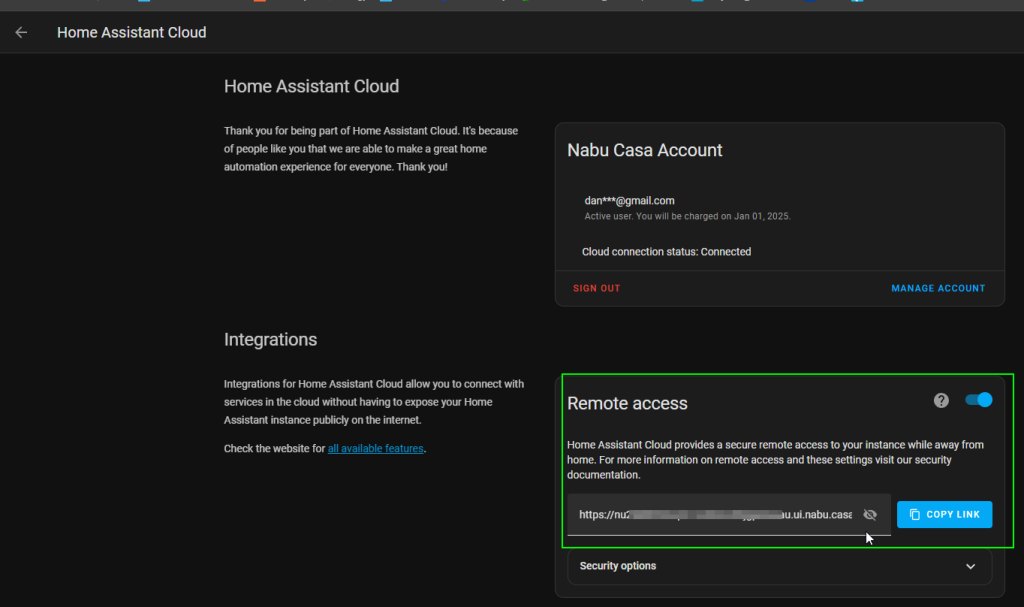
- If using Nabu Casa, the URL can be found by navigating to: Settings > Home Assistant Cloud
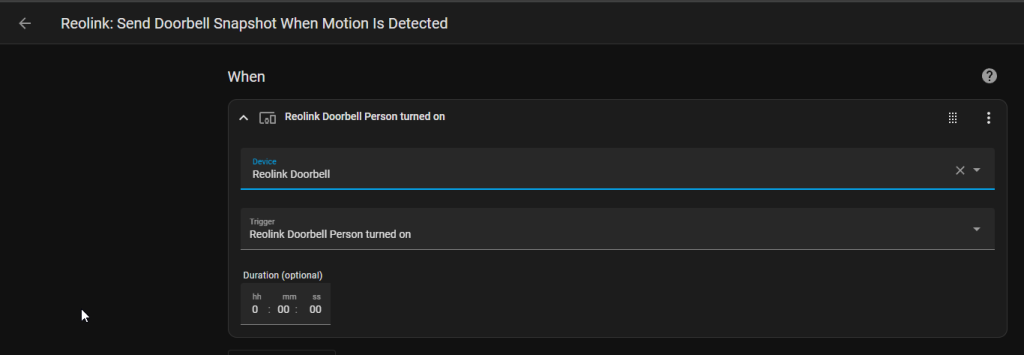
IF YOU DON’T SUBSCRIBE TO NABU CASA / HAVE EXPOSED TO HOME ASSISTANT TO THE INTERNET…
You can simply use your local IP address of Home Assistant. This just means you’ll receive notifications with pictures at home, but not remotely.
YAML AUTOMATION
Just replace the device_id, entity_id and other entities with your own – and you should be good to go.
And like I mentioned earlier, if you DON’T have Home Assistant remotely, you can replace the URI with your local HA IP in this format: https://192.168.192:8123 (whatever your HA IP is), and that will allow you receive notifications while you are at home, connected to your home wifi, but not remotely if you are away from home.
You’ll notice in the Action: section below, I have configured an actionable notification to open a link to a page where I only have added my doorbell camera. This allows me to click the “Stream” button from my phone and quickly navigate to that HA page. Note: You’ll need to add your doorbell camera to a new “View” for that portion to work. If you don’t want to view the livefeed, just delete that Action.
alias: "Reolink: Send Doorbell Snapshot When Motion Is Detected"
description: ""
trigger:
  - type: turned_on
    platform: device
    device_id: 53fb546c8837ecba20f84efb1f78928c
    entity_id: 28a7c9337714815adc5f36d2c707b1a5
    domain: binary_sensor
condition: []
action:
  - service: camera.snapshot
    data:
      filename: /config/www/doorbell/snapshot-doorbell.jpg
    target:
      device_id: 53fb546c8837ecba20f84efb1f78928c
  - service: notify.mobile_app_pixel_7
    data:
      message: Someone at door dude.
      title: Motion detected
      data:
        image: >-
          https://nuXXXXXXXXXXXXXXXXXXXXXXXXXXXX.ui.nabu.casa/local/tmp/snapshot-doorbell.jpg
        entity_id: camera.doorbell
        actions:
          - action: URI
            title: Stream
            uri: >-
              https://nuXXXXXXXXXXXXXXXXXXXXXXXXX.ui.nabu.casa/lovelace/doorbell
mode: single
Wrapping Up
Hopefully this simple how-to guide helps you send notifications from your Reolink doorbell, or any other camera, to your phone using Home Assistant.
This is great for displaying who is at your front door (or any door), and also getting pictures of the person who is there directly from Home Assistant.
If you run into any issues, let me know!
