In this guide, I’m going to show you how to display a live video feed of your doorbell in a picture-in-picture (PIP) window on your Nvidia Shield using Home Assistant. This should also work on your Google TV’s.
This guide is fairly complex. I spent an entire day piecing together several guides/posts before I could get it to work. Also, I wrote this guide on 5/9/2024, so everything in this guide is accurate and working as of today.
Luckily for you, I documented every step I took along the way to hopefully make this as easy as possible to follow!
Unrelated: Both my doorbell, and my Nvidia shield are both on wifi, and I’m able to see video on my TV within 1-2 seconds with this setup.
Let’s get started!
Reference Material
First, I want to credit Sean Blanchard and the HA community for the inspiration and help getting this work. I honestly couldn’t have gotten it setup without them.
Here’s the main guides / posts I referenced:
- https://seanblanchfield.com/2023/06/realtime-pip-cameras-on-tv-with-home-assistant-v2
- https://community.home-assistant.io/t/integration-android-tv-live-cam-video-streams-in-a-picture-in-picture-triggered-by-motion-detection-aka-video-doorbell/339759/114
Sean’s guide got me 90% of the way there. He was using Linux, I’m using Windows, and in one of his steps – he’s using a different APK build than I had to use, which caused my stream to load a white box on the PIP window on the TV. Also, some of the commands he recommended we use are Linux-only (grep, for example), unless we downloaded a seperate package for Windows.

He also mentioned that he needed to port forward on his router; which I didn’t need to do. No ports need to be forwarded/opened for this setup.
Why set this up?
I really wanted a way to display a live video feed, vs an image, on my TV when motion is detected at my doorbell.
You might be thinking, “There’s already ways to cast your camera to your TV, tablet, or other devices using Home Assistant! Why not use one of those?“
Using that Cast integration is very intrusive. If I was in the middle of watching a Netflix show, I’d get rudely interrupted by the full-screen notification. The show I was watching would pause, and then I’d have to click back on the remote to exit the notification. This does not pass the WAF factor, and doesn’t make for a good user experience in my home.
So, showing a picture-in-picture stream in the corner of my TV was the better solution. My show would continue, the popup disappears in 60 seconds, and I don’t have to worry about it grabbing a blurry image of whoever is at my door.
Hardware
I’m using a Reolink Doorbell, Nvidia Shield, and a few Home Assistant addons/integrations.
This will also work for Android TV/Google TV/Firesticks, although the steps may slightly differ on those devices and have not been personally tested by me. I do own those other devices, so I may create a future guide with any changes needed to get those working.
Prerequisites
- You will need Home Assistant up and running.
- You will need a camera with RTSP enabled. There are likely options in the settings of your camera to turn RTSP on.
- You will need the IP address of your doorbell/camera.
- Take note of the username / password for the camera; you will need that too.
- Your camera should be added to Home Assistant already. That way you create an automation based on “If movement is detected, then cast the stream to your TV”.
- An Nvidia Shield, Google TV, or Android TV.
- HACS needs to be installed.
Step 1: Install Go2rtc
First, go to this link and scroll down until you see the blue button that says “Show Add-On”.

Once added to Home Assistant, click Install.

Then, start the addon.

Step 2: Download WebRTC Camera integration
Next, download the WebRTC Camera custom integration: https://github.com/AlexxIT/go2rtc#go2rtc-home-assistant-integration
This can be done by going to:
- HACS > Integrations > Plus > WebRTC > Install
Step 3: Install WebRTC integration
Now that the integration is downloaded, we need to install and configure it.
- Settings > Devices & Integrations > Add integration > WebRTC Camera
Click install. Use the basic for now (unless you use Frigate already, then you can use that URL). Then click Submit.

Step 4: Set up Generic Camera integration in Home Assistant
Next, we need to verify that the RTSP stream is working correctly. I like to do this in VLC Media Player first before attempting in Home Assistant. If it works in VLC, then you know it’ll work in HA. Just download VLC, then click the Media tab at the top > Open Network Stream.

The syntax you’ll use is below. Obviously replace the username, password, and IP with yours.
rtsp://CameraUsername:CameraPassword@CameraIPAddress:554
Once you verify it’s working in VLC, you can add the generic camera to Home Assistant.
- Settings > Devices and services > Add integration > Generic Camera
For the stream source, use the RTSP stream:
rtsp://CameraUsername:CameraPassword@CameraIP:554Select TCP, and leave everything else as default empty. I think Verify SSL is checked, so uncheck that, then click Submit.

After adding the camera, you should go to Settings > Devices & Integrations > Devices tab > find the camera > and change the name. Click the 3 dots in the top right corner.

To test that it’s working, let’s add a GoToRTC Camera Card to a dashboard.
- Add Card > Custom RTC Camera

When adding one of these camera cards, it defaults to adding a url: , but you can delete that and put entity: instead.

After a few seconds, your camera should be visible on your dashboard.
Step 5: Nvidia Shield / Android TV Setup
The first thing you’ll need to do is make sure Debugging Mode is turned on in your Nvidia Shield (which is what I’m using), or your Google/Android TV.
To enable debugging mode:
- On your home screen, click Settings > Device preferences > About. Click About 7 times until it shows a dialog box confirming it’s been enabled.
- Click the back button on your TV remote, then scroll down to Developer Options and make sure it’s enabled.
- Inside the Developer Tools options, Enable USB Debugging.
- Exit to the main screen of your Shield.
After that, you need to grab the IP address of your TV. You can do this by pressing Home and then Network Settings. You can also find this in your router.
Step 6: Install Android Studio on your PC
I’m using Windows 11. If you’re using a different OS like Linux or Mac, then the steps below may differ.
- Download Android Studio from this link: https://developer.android.com/studio
- Install with all defaults.
- Then, start Android Studio. Do not import settings. Proceed with the Standard install. Accept the TOS of everything. Click Finish, then wait a few minutes for everything to be installed.
- Once downloaded and installed, you can close Android Studio.
Note: You probably don’t have to download the entire Android Studio. We just need it to get the ADB commands. But for simplicity, I just downloaded the entire thing.
To confirm it installed correctly, navigate to C:\Users\Danny\AppData\Local\Android\Sdk\platform-tools (replacing the username with your username, of course)
You should see a list of these files:

Step 7: Connect to TV over Command Prompt
Next, Open Command Prompt on your computer. We are going to change directories (cd) to the platform-tools folder.
cd C:\Users\Danny\AppData\Local\Android\Sdk\platform-toolsThen, type the below code, replacing the IP address with the IP address of your Shield/Google TV.
adb connect 192.168.1.77
When you run that, it may fail the first time. This is because you haven’t authorized the Nvidia Shield or TV yet.
On your TV, you’ll now see a popup message that says “Allow Network Debugging?”. Click Always Allow from this computer, then Allow.

Step 8: Download app-debug.apk file
At this point, we are ready to send a test picture-in-picture message to your TV.
Go to this URL: https://github.com/desertblade/PiPup/releases
Click the app-debug.apk file. It will download it to your Downloads folder on your Windows computer.

In the Command Prompt window you already have open, type (replacing the User ‘Danny’ with your user:
adb install C:\users\Danny\Downloads\app-debug.apkIt should show a “Success” message if it installed correctly on the Shield/TV.

Then, run this command:
adb shell appops set nl.rogro82.pipup SYSTEM_ALERT_WINDOW allowIMPORTANT NOTE: If you followed Sean’s guide at all (https://seanblanchfield.com/2023/06/realtime-pip-cameras-on-tv-with-home-assistant-v2), and couldn’t end up getting to work, or you saw a white box like the image you see under the “Reference Material” section at the top of this guide – then you will need to uninstall the PipUp app from your Shield.
Go to your TV > Apps > find the app, and uninstall. And then run the 2 commands above again with the updated code. The code in Sean’s guide needs a https:// URL, whereas the code in the my guide (the desertblade link) does not.
If this is the first guide you found, you don’t need to do uninstall anything.
Step 9: Create post.json file
Navigate back to your C:\Users\Danny\AppData\Local\Android\Sdk\platform-tools folder in File Explorer.
Right-click the empty space, and create a new text file called post.json. It will probably name it post.json.txt, so make sure to delete the .txt part. A popup will ask if you want to change the file type, so click Yes.
Paste in this code. Then Save the file.
**We are doing this so we can test if it successfully sends a command to the TV in a PIP window**
{
    "duration": 30,
    "position": 0,
    "title": "Test Title",
    "titleColor": "#0066cc",
    "titleSize": 20,
    "message": "Test Body Message",
    "messageColor": "#000000",
    "messageSize": 14,
    "backgroundColor": "#ffffff",
    "media": {
        "image": {
            "uri": "https://mir-s3-cdn-cf.behance.net/project_modules/max_1200/cfcc3137009463.5731d08bd66a1.png",
            "width": 480
        }
    }
}
Step 10: Use CURL command to POST to your TV
Next, paste in the below command into your Command Prompt window. Replace the IP address with the IP of your TV/Shield device. This command is basically taking the data from the post.json file in the previous step, and posting it to your TV.
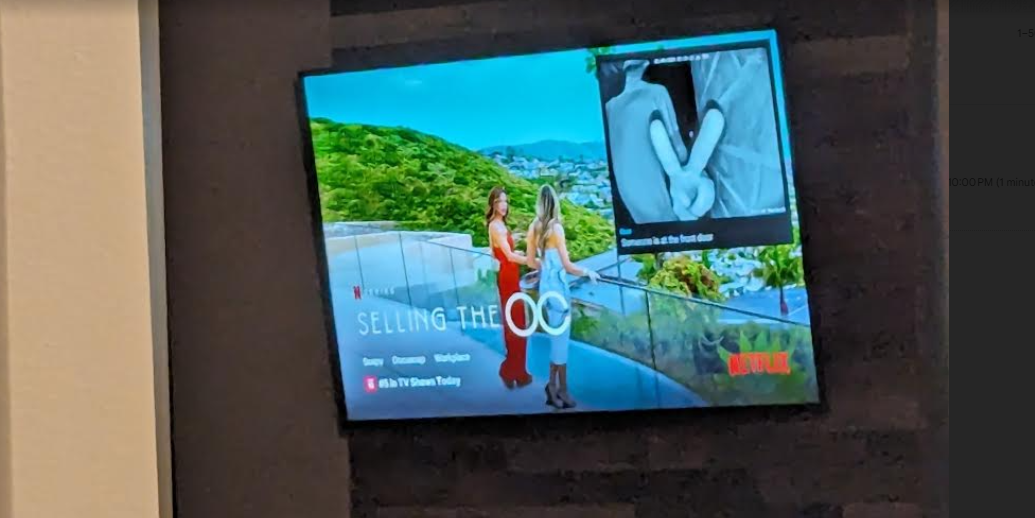
curl -d "@post.json" -H "Content-Type: application/json" -X POST http://192.168.1.77:7979/notifyYou should now see a picture-in-picture message on your TV like this:

Step 11: Create RESTFUL sensor
For this step, we are creating a restful sensor that can be used in future automations.
Instead of CURLing from a file on our Windows PC, we’re putting this data into a file Home Assistant can reference.
In Home Assistant, open File Editor > Configuration.yaml
If you don’t already have a rest_command block in your configuration file, add it like I did below, then Save.
rest_command: !include rest_commands.yaml
Next, we need to create that file that the configuration file is referencing.
Click the folder in the top left and click New File. Name it rest_commands.yaml, then paste in the code below. Change out ONLY the IP address with the IP of your TV.

pipup_url_on_tv:
  # Use with Webrtc camera as described here:
  # https://github.com/AlexxIT/WebRTC/wiki/Cast-or-share-camera-stream#html-page
  url: http://192.168.1.77:7979/notify
  content_type: 'application/json'
  verify_ssl: false
  method: 'post'
  timeout: 20
  payload: >
    {
      "duration": {{ duration | default(20) }},
      "position": {{ position | default(0) }},
      "title": "{{ title | default('') }}",
      "titleColor": "{{ titleColor | default('#50BFF2') }}",
      "titleSize": {{ titleSize | default(10) }},
      "message": "{{ message }}",
      "messageColor": "{{ messageColor | default('#fbf5f5') }}",
      "messageSize": {{ messageSize | default(14) }},
      "backgroundColor": "{{ backgroundColor | default('#0f0e0e') }}",
      "media": {
        "web": {
          "uri": "{{ url }}",
          "width": {{ width | default(640) }},
          "height": {{ height | default(480) }}
        }
      }
    }
Click Save, then reload the config file from Developer Tools > All YAML Configurations.
Step 12: Restart Home Assistant
Then, restart Home Assistant from Settings > System.
Step 13: Send test message using Restful Command in Home Assistant
Go to Developer Tools > Services. Type restful and click the new restful service you created.
Click Go to Yaml Mode.

In the Data section, paste this:
data:
  title: Hey! This is working!
  message: You are about 90% complete with this project!
  titleColor: purple
  position: 0
  url: https://encrypted-tbn0.gstatic.com/images?q=tbn:ANd9GcQt2PkGvxbADx8hONUTfpcQhJUc5OSbQWhbRR57uiU-Qg&s
The entire service call should look like this:

Click Call Service, and you should now see a message posted to your TV!

Step 14: Create Video Feed Script
Now that we know a still image posts, we need to try a live feed from our Reolink video doorbell.
To do this, we are going to create a Home Assistant script.
- File Editor > click the folder in the top left > scripts.yaml.
- Paste in the code below at the bottom of your scripts.yaml page.
- The only things you need to change are the entity: and the url:
display_driveway_pip_popup_on_tv:
  alias: Display Driveway PIP Popup on TV
  mode: single
  variables:
    link_id: '{% for _ in range(40) %}{{ range(10)|random }}{% endfor %}'
  sequence:
  - service: webrtc.create_link
    data:
      link_id: '{{ link_id }}'
      entity: camera.doorbell
      open_limit: 1
      time_to_live: 60
  - service: rest_command.pipup_url_on_tv
    data:
      title: Door
      message: Someone is at the front door
      width: 640
      height: 480
      url: http://192.168.1.92:8123/webrtc/embed?url={{ link_id }}
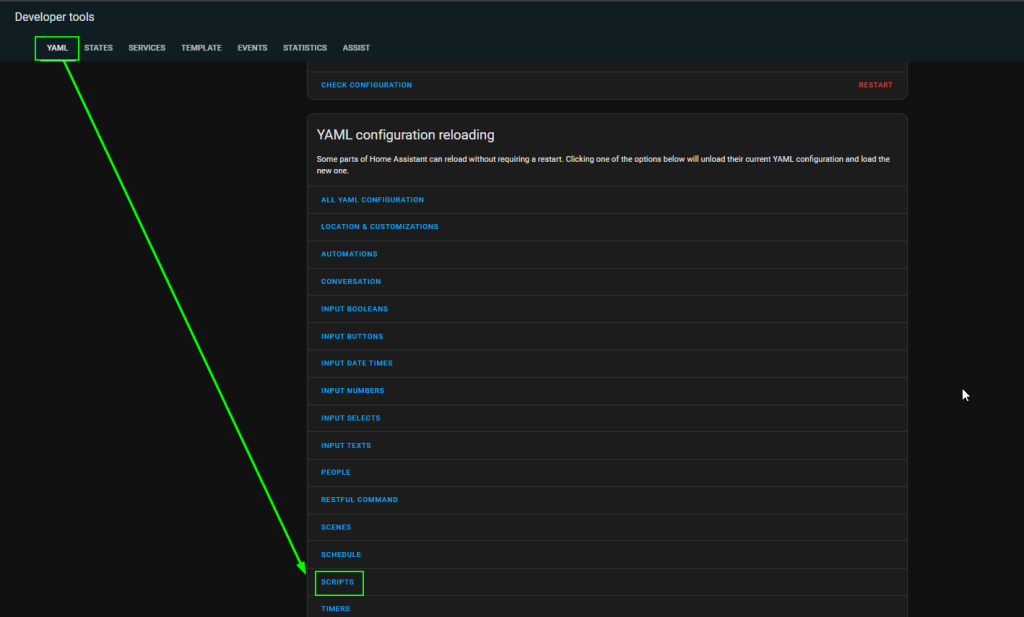
Save your scripts configuration file, then go to Developer Tools > YAML tab > and reload the Scripts section.
Step 15: Test Your Script
Next, it’s time to test your script!
- Developer Tools > Services > start typing ‘script’, click your new script, then Call Service.

If all goes well, you should now see a 60-second video feed of your camera on your TV.
You’ll need your TV to be on and the Nvidia Shield menu open (or a movie or TV show playing from your TV).
Step 16: Create Automation to Display Video on TV if Motion is Detected
At the beginning of this guide, I mentioned that your doorbell/camera should already be added to Home Assistant. Since it is, this automation is simple.
If camera detects motion, then run the Script: Display PIP Popup on TV.
- Settings > Automations & Scenes > Create Automation > Create new automation
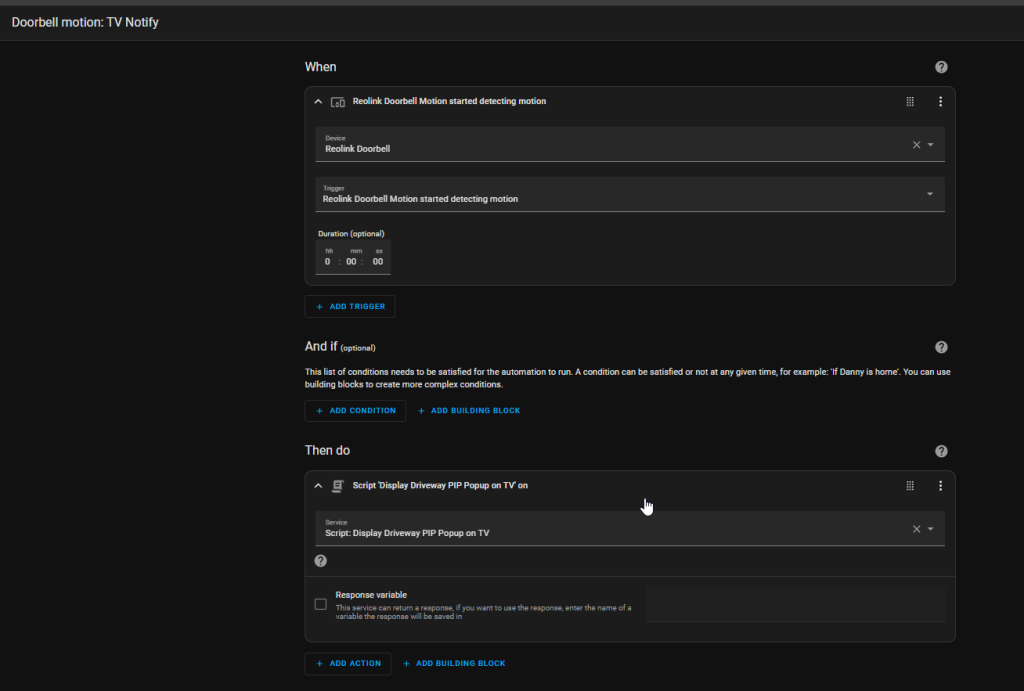
And that’s it! You have now successfully casted a picture-in-picture feed of your doorbell camera to Home Assistant when motion is detected.
You didn’t think I’d leave you hanging, did you? Of course I’m going to include a demo of this working in 2024!
Like I said – both my Reolink Wifi Doorbell Camera and Nvidia Shield are both on wifi, but as you can see in the video – the response time is VERY quick.
Wrapping Up
Hopefully this guide helps you setup a TV notification like it did for me! Comments really help others, so if this helped you, or you have any questions on the setup, feel free to comment below so I can assist you.
Test from stranger
Reply from Danny test
You’ve misspelt Nvidia!
No need to install full–fat android studio either, you can download just the platform-tools
https://developer.android.com/tools/releases/platform-tools is enough (or using scoop.sh and install adb via scoop will add it to PATH)
Great guide though!
Thank you it’s work 👍 but you need to open Popup application on TV to make commands work with port 7979, and it’s laggy response with me! My HASS on wifi not Ethernet
Super nice guide! Thank you very much for the work. 👌
I think there is a little mistake in the 60 seconds display as in the config it shows “”duration”: {{ duration | default(20) }},” I changed to 60 for it to last 60 seconds.
All set on Sony Android TV with stream from Unifi camera working flawlessly.
I have a problem with muted audio on the TV (main) source when PiP shows up, and even after PiP disappears – it stays muted.
I have to change the source on TV in order to get audio again.
Maybe You has some advice?
Thanks…
not sure if your still facing this issue, but I found that In the “Perform action ‘rest_command.pipup_url_on_tv'” script, add “&media=video” (without the quotes) at the end of the URL. This modification will stream only the video from the doorbell, omitting the audio.
For example, the URL should look something like this:
“http://(home_assistant_ip_address)/webrtc/embed?url={{ link_id }}&media=video”
This solved my issue, and now the popup no longer interrupts the audio of what’s playing what’s playing on my Chromecast with Google TV.
Superb and easy to follow guide! I had been banging my head against the wall trying to make Sean’s guide work and then I found this walkthrough. Can’t thank you enough. Really well done and I’m now up and running – same setup as you actually (Reolink Doorbell, although PoE version, with NVIDIA Shield).
That’s awesome! I’m really glad it worked out well for you. I tried to document every step I took along the way to make it as easy as possible to others to follow, so it’s reassuring to hear everything worked great for you as well!
I’ve been using it on both of my Shields now (one Pro and one non-Pro) and both are working like a charm. The one problem that I’ve encountered is that the PIP popup doesn’t appear to work when I’m watching something in Emby (which, unfortunately, is the app we use most). It’s possible that the popup is popping up but it doing so behind the Emby playback. Have you encountered any apps that disallow or block the PIPup?
Thanks a lot for this.I have this working on a Chromecast and Reolink doorbell. You sir are a legend. As someone mentioned before i had to manually open the pip app on the chromecast first for the curl command to work but the rest was a breeze.
The video is not playing on the PIP notification on TV. It is in paused state
I had great success with setting this up a couple months ago. Thank you for making this guide so easy to follow. I’m just curious now if anything has changed now that 2024.11 has introduced native WebRTC support. Is the process more streamlined? Is there any changes for us to make to existing installs to utilize the WebRTC for even lower latency?
Doesn’t seem to work with tapo c210 cameras. Everything in you setup guide worked according to instructions till I try to display my camera. Just a white box.
Would you happen to know if this will work on a Samsung smart TV? I have the Reolink PoE doorbell but would like the main display for the PiP on our smart TV rather than on my Nvidia shield TV
Awesome write-up. Has anyone been able to find a solution to prevent the popup from muting or stopping the playback on the display? Would just like to see the popup with no sound, while still continuing to watch Netflix or other media.
Thanks to Troy below, but adding &media=video to the script “Display Driveway PIP Popup on TV” under the Perform action ‘rest_command.pipup_url_on_tv” fixes it.
Full URL should look like this:
http://(home_assistant_ip_address)/webrtc/embed?url={{ link_id }}&media=video
I got to the point of doing the script and the box shows up on the TV, but it says connection refused and has a non working webpage in the popup.
This is what I have so far:
display_driveway_pip_popup_on_tv:
alias: Display Driveway PIP Popup on TV
mode: single
variables:
link_id: ‘{% for _ in range(40) %}{{ range(10)|random }}{% endfor %}’
sequence:
– action: webrtc.create_link
data:
link_id: ‘{{ link_id }}’
entity: camera.front_doorbell_fluent
open_limit: 1
time_to_live: 60
– action: rest_command.pipup_url_on_tv
data:
title: Door
message: Someone is at the front door
width: 640
height: 480
url: http://192.168.0.28:8123/webrtc/embed?url={{ link_id }}
I changed it to my IP address and it gives me the error above. I have tried to change the port with all the options from the advanced camera settings and that does nothing either.
I’m getting curl error: (52) Empty reply from server in CMD when running the Curl test… any tips?
Go to the tv and start the pip app.
Thank you for the walk though but I am having issues at performing the script. Every other step works wonderfully, but when I try and do the video it gives me the following error:
Err_connection_refused and a non working webpage inside the square popup.
Same here. Can’t seem to understand where the problem is.
Hi,
Any chance you can update this for the changes they made in home assistant. I can’t create a custom card for webrtc anymore. also when trying to run the script i get this error: Action webrtc.create_link not found.
I had the same issue, wasn’t sure where to dig so I just ditched the webrtc stuff and pointed the url to the rtsp stream of my Reolink POE directly. I haven’t fully tested this yet, so I don’t know what happens to audio, for example.
display_frontdoor_pip_popup_on_tv:
alias: Display Front Door PIP Popup on TV
mode: single
sequence:
– service: rest_command.pipup_url_on_tv
data:
message: Someone is at the front door
url: rtsp://admin:password@192.168.0.100:554/Preview_01_sub
Hello to future Googlers and the creator of this guide,
I followed this guide and got the setup working great! However, I encountered an issue with my Chromecast with Google TV. It has a habit of pausing whatever is playing when the doorbell feed shows up. Initially, I solved this by adding a media player “play” action after displaying the doorbell feed, but it wasn’t ideal.
After some research and forum browsing, I found that the WebRTC link includes both video and audio, which steals focus from the currently playing app and causes it to pause. Thanks to ChatGPT and the WebRTC documentation, I discovered a simple solution: In the “Perform action ‘rest_command.pipup_url_on_tv'” script, add “&media=video” (without the quotes) at the end of the URL. This modification will stream only the video from the doorbell, omitting the audio.
For example, the URL should look something like this:
“http://(home_assistant_ip_address)/webrtc/embed?url={{ link_id }}&media=video”
This solved my issue, and now the popup no longer interrupts what’s playing on my Chromecast with Google TV.
A big thank you to the guide creator for their excellent work—your guide made this setup possible, and I appreciate the effort you put into it!
THANK you! That was one of the only things that bothered me with this setup. I just applied the fix to my own setup on Shield and it worked great – no more pausing while a show it playing.
I’m really glad you were able to get this working for yourself as well!
Fantastic guide thank you so much! For my specific case, I found no need to setup the WebRTC integration or the generic camera (steps 3 & 4). I simply pass the go2rtc stream directly the rest call and PiPup. Works great. I did find myself curious, what is the purpose or benefit of doing that?
This journey was long and fantastic!!! Thank you sir!!
got through the whole setup but cannot find any way to create an automation for motion detection. I enabled motion detection in my camera but nothing flows through to Home Assistant. Please help!